
As Easter approaches, I'm sure many of us are on the hunt for adorable treats that will not only delight our taste buds but also add a sprinkle of joy to our celebrations. In this guide, I've gathered my favorite cute and creative recipes that are perfect for sharing with family and friends. From Bunny Oreo Balls to delightful Easter Egg Nest Tarts, you'll discover step-by-step tutorials to help you whip up these charming goodies in no time. Get ready to impress your loved ones with delicious and visually stunning creations that stand out at any holiday gathering!
1. Easter Bunny Button Cookies
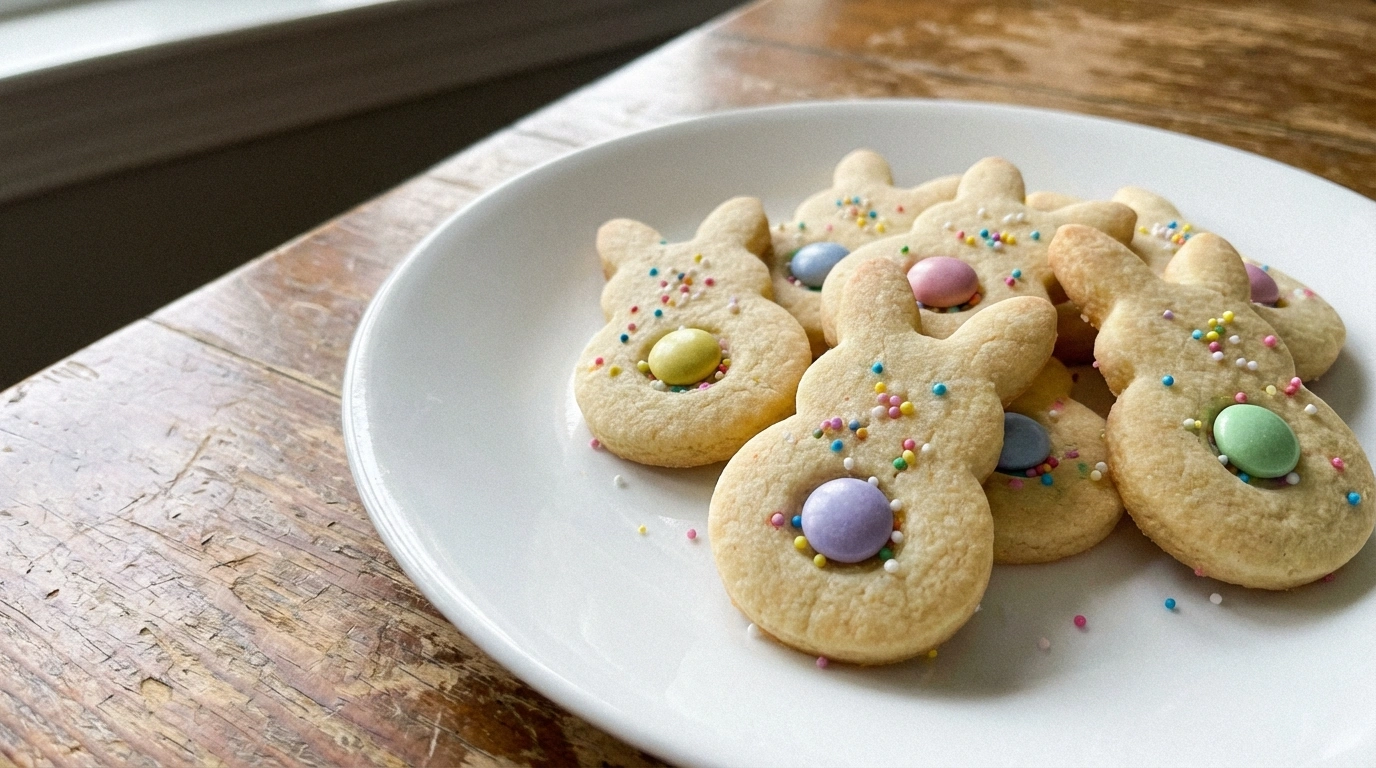
introduction
Easter Bunny Button Cookies are small, soft cookies decorated like little bunny buttons. They look bright and fun. If you like light, crumbly treats, you may also enjoy rose and pistachio shortbread cookies for a different flavor idea.
why make this recipe
Make this recipe because it is quick and fun. Kids like to help press and decorate the buttons. The cookies use simple ingredients and taste like a classic sugar cookie, similar to some popular vanilla sandwich cookies but with a bright Easter twist.
how to make Easter Bunny Button Cookies
These cookies are easy to make. Follow the steps in order and keep your dough cool if it gets soft. For soft, chewy results, some bakers read tips used in recipes like Vermont chewy molasses cookies to understand how oven time affects texture.
Ingredients :
2 3/4 cups all-purpose flour, 1 teaspoon baking soda, 1/2 teaspoon baking powder, 1 cup unsalted butter, softened, 1 1/2 cups white sugar, 1 egg, 1 teaspoon vanilla extract, 1/2 teaspoon almond extract, 1 teaspoon salt, Pastel colored icing, Decorative sprinkles
Directions :
- Preheat the oven to 375°F (190°C).
- In a bowl, mix flour, baking soda, and baking powder.
- In a separate bowl, cream together the butter and sugar until smooth.
- Beat in the egg, vanilla extract, and almond extract.
- Gradually blend the dry ingredients into the creamed mixture.
- Roll into small balls and place on a baking sheet.
- Flatten each ball slightly and bake for 8-10 minutes.
- Allow to cool, then decorate with pastel icing and sprinkles to resemble bunny buttons.
how to serve Easter Bunny Button Cookies
Serve these cookies on a platter at a brunch or as a snack. They look nice in a basket with a paper liner. They also work well packed in small boxes for gifts.
how to store Easter Bunny Button Cookies
Store cookies in an airtight container at room temperature for up to 4 days. If you need to keep them longer, freeze the baked cookies in a single layer, then transfer to a freezer bag for up to 2 months. Thaw at room temperature before serving.
tips to make Easter Bunny Button Cookies
Chill the dough if it gets too soft. Use room-temperature butter to cream well with sugar. For softer cookies, follow general advice on the secret to chewy cookies about oven temperature and baking time. Press the tops gently to form a button shape before baking.
variation (if any)
- Add a little lemon zest for a fresh taste.
- Use colored sanding sugar instead of sprinkles for a different look.
- Make them larger and add two icing dots to look like a full bunny face.
FAQs
Q: Can I use salted butter?
A: Yes, but reduce added salt to 1/2 teaspoon.
Q: Can I make the dough ahead?
A: Yes. Chill the dough up to 2 days before baking, or freeze for longer.
Q: How do I keep the cookies soft?
A: Bake just until the edges set and use tips on the secret to chewy cookies page for best results.
Q: Can I skip the almond extract?
A: Yes, you can skip it or replace it with more vanilla if preferred.
Easter Bunny Button Cookies
Ingredients
Method
- Preheat the oven to 375°F (190°C).
- In a bowl, mix the flour, baking soda, and baking powder.
- In a separate bowl, cream together the butter and sugar until smooth.
- Beat in the egg, vanilla extract, and almond extract.
- Gradually blend the dry ingredients into the creamed mixture.
- Roll into small balls and place them on a baking sheet.
- Flatten each ball slightly and bake for 8-10 minutes.
- Allow to cool, then decorate with pastel icing and sprinkles to resemble bunny buttons.
Notes
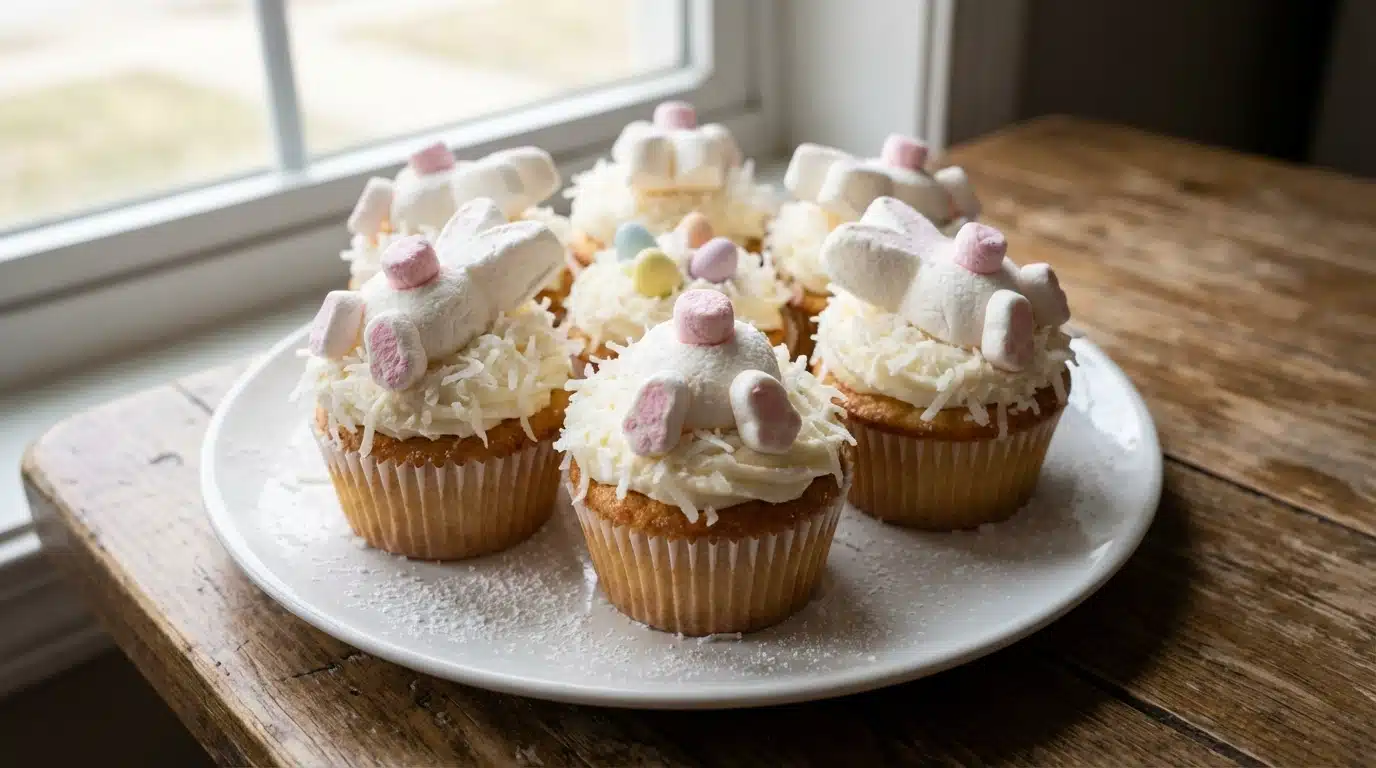
2. Bunny Bum Cupcakes
why make this recipe
Bunny Bum Cupcakes are a delightful and whimsical treat perfect for spring celebrations, Easter gatherings, or any fun event. Their cute appearance and delicious chocolate flavor make them a hit with both kids and adults. These cupcakes not only taste great but also add a festive touch to your dessert table. Plus, they are easy to make, so you can enjoy baking together with family and friends!
how to make Bunny Bum Cupcakes
Ingredients
- 1 box of chocolate cake mix
- 3 large eggs
- 1/2 cup vegetable oil
- 1 cup water
- 1 can of white frosting
- Mini marshmallows
- Coconut flakes
- Chocolate chips
- Pink sprinkles
Directions
- Preheat the oven to 350°F (175°C) and line a cupcake pan with cupcake liners.
- In a large bowl, combine the cake mix, eggs, vegetable oil, and water, then mix until well combined.
- Pour the batter into the cupcake liners, filling each about 2/3 full.
- Bake for 18-20 minutes or until a toothpick comes out clean.
- Allow the cupcakes to cool completely.
- Once cooled, frost each cupcake generously with white frosting.
- To make the bunny tails, place mini marshmallows on top of the frosting and coat them with shredded coconut to resemble fluffy tails.
- Use chocolate chips for eyes and pink sprinkles for a nose.
- Enjoy your festive Bunny Bum Cupcakes!
how to serve Bunny Bum Cupcakes
Serve Bunny Bum Cupcakes on a fun platter or cupcake stand. They look best arranged together, showcasing their cute bunny features. You can also provide napkins and plates for guests to enjoy these delightful treats. Pair them with milk or a fun beverage for an even sweeter experience!
how to store Bunny Bum Cupcakes
Store Bunny Bum Cupcakes in an airtight container at room temperature for up to 3 days. If you want to keep them fresh longer, you can refrigerate them for up to a week. Just be sure to allow them to come to room temperature before serving to keep the frosting at its best.
tips to make Bunny Bum Cupcakes
- Use a high-quality chocolate cake mix for the best flavor.
- Make sure to let the cupcakes cool completely before frosting them to prevent the frosting from melting.
- For a touch of creativity, try adding other decorations like edible glitter or different colored sprinkles.
- If you’re making these cupcakes for a party, consider making a double batch to ensure everyone gets to enjoy them!
variation
If you want to switch things up, you can use vanilla or carrot cake mix instead of chocolate. For a healthier twist, consider using reduced-fat frosting or swapping some of the frosting for whipped cream.
FAQs
1. Can I use homemade cake batter instead of a boxed mix?
Yes, you can use your favorite homemade chocolate cake recipe instead of a boxed mix. Just make sure it yields enough batter for cupcakes.
2. How can I make the cupcakes gluten-free?
To make gluten-free Bunny Bum Cupcakes, you can use a gluten-free chocolate cake mix instead of traditional flour-based mixes.
3. Can I freeze Bunny Bum Cupcakes?
Yes, you can freeze the baked and cooled cupcakes without frosting. Wrap them tightly in plastic wrap and store them in an airtight container. When you’re ready to enjoy, let them thaw at room temperature before frosting them.
Bunny Bum Cupcakes
Ingredients
Method
- Preheat the oven to 350°F (175°C) and line a cupcake pan with cupcake liners.
- In a large bowl, combine the cake mix, eggs, vegetable oil, and water, then mix until well combined.
- Pour the batter into the cupcake liners, filling each about 2/3 full.
- Bake for 18-20 minutes or until a toothpick comes out clean.
- Allow the cupcakes to cool completely.
- Once cooled, frost each cupcake generously with white frosting.
- To make the bunny tails, place mini marshmallows on top of the frosting and coat them with shredded coconut to resemble fluffy tails.
- Use chocolate chips for eyes and pink sprinkles for a nose.
Notes
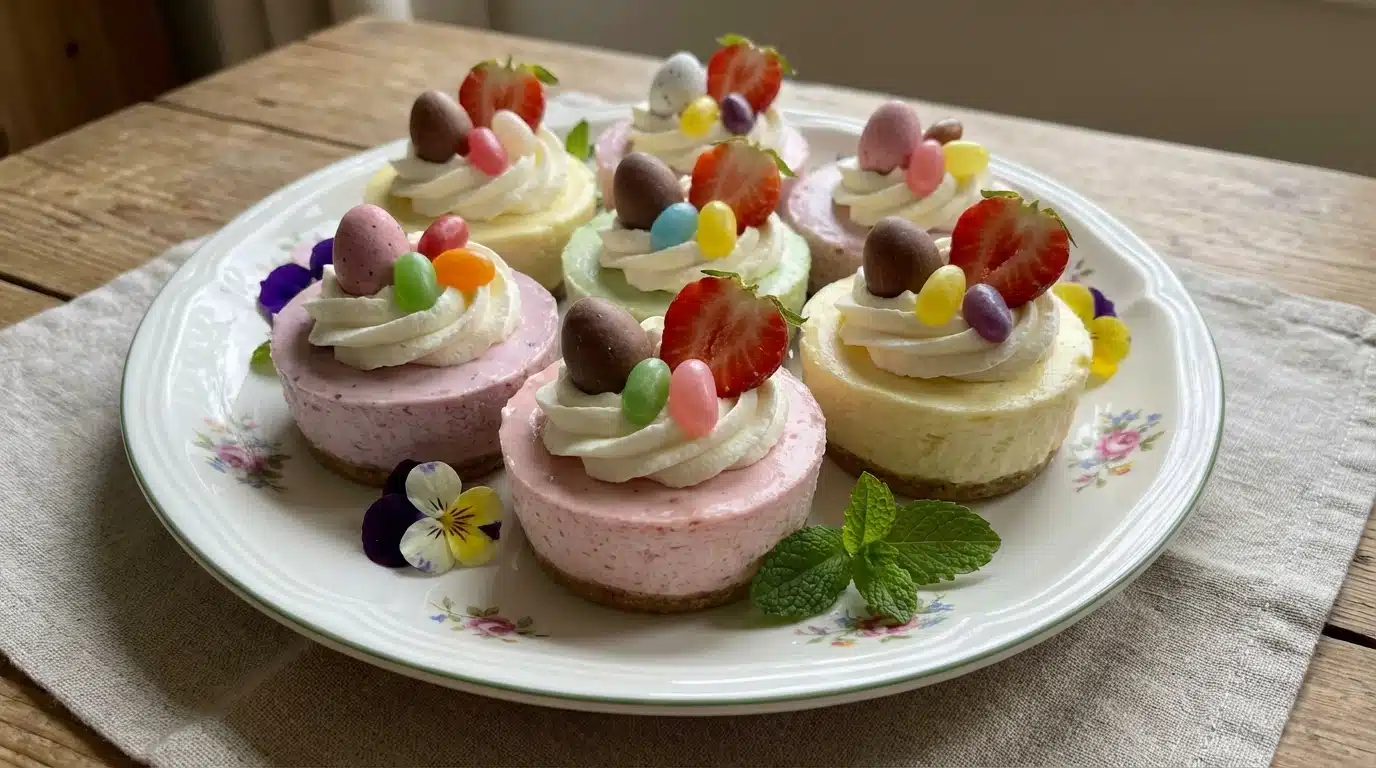
3. Easter No-Bake Mini Cheesecakes
why make this recipe
Easter No-Bake Mini Cheesecakes are a delightful treat that brings joy to any celebration. These mini cheesecakes are easy to make and perfect for sharing with family and friends. The best part? You don’t need to bake them! They are creamy, delicious, and can be topped with your favorite fruits or chocolates. Plus, they will impress everyone at your Easter gathering without taking too much of your time in the kitchen.
how to make Easter No-Bake Mini Cheesecakes
Ingredients:
- 8 oz cream cheese, softened
- 1/2 cup powdered sugar
- 1 teaspoon vanilla extract
- 1 cup heavy cream
- Graham cracker crumbs
- Fruit or chocolate for topping (optional)
Directions:
- In a mixing bowl, beat the softened cream cheese until smooth.
- Add powdered sugar and vanilla extract, and mix until well combined.
- In a separate bowl, whip the heavy cream until stiff peaks form.
- Gently fold the whipped cream into the cream cheese mixture until fully combined.
- In serving cups, layer graham cracker crumbs at the bottom, then spoon the cheesecake mixture on top.
- Chill in the refrigerator for at least 2 hours.
- Before serving, top with your choice of fruit or chocolate. Enjoy!
how to serve Easter No-Bake Mini Cheesecakes
Serve these mini cheesecakes in individual cups for an easy and fun presentation. You can add a variety of toppings like fresh berries, chocolate shavings, or caramel drizzle to each cup. They are perfect for parties and gatherings, allowing guests to pick their favorite flavors!
how to store Easter No-Bake Mini Cheesecakes
You can store these mini cheesecakes in the refrigerator. Keep them in an airtight container for up to 3 days. If you need to store them for a longer period, consider freezing them without the toppings. When ready to enjoy, simply thaw in the fridge and add your toppings before serving.
tips to make Easter No-Bake Mini Cheesecakes
- Make sure your cream cheese is softened to room temperature for easier mixing.
- Whip the heavy cream until stiff peaks form to give the cheesecake a light and fluffy texture.
- Feel free to experiment with different toppings like crushed cookies, nuts, or even a drizzle of honey for extra flavor.
variation
You can easily customize these mini cheesecakes by adding different flavors. Try mixing in some cocoa powder for a chocolate version or adding lemon zest for a refreshing twist. You can even use flavored cream cheese, like strawberry or chocolate, for added variety.
FAQs
Q: Can I use low-fat cream cheese?
A: Yes, low-fat cream cheese can be used. However, the texture and flavor may differ slightly.
Q: How long do these cheesecakes need to chill?
A: They need to chill for at least 2 hours to set properly, but you can leave them in the fridge longer if needed.
Q: Can I use whipped topping instead of heavy cream?
A: Yes, you can use whipped topping as a substitute for heavy cream, but it may alter the creaminess of the cheesecakes.
Enjoy making and sharing these delightful Easter No-Bake Mini Cheesecakes!
Easter No-Bake Mini Cheesecakes
Ingredients
Method
- In a mixing bowl, beat the softened cream cheese until smooth.
- Add powdered sugar and vanilla extract, and mix until well combined.
- In a separate bowl, whip the heavy cream until stiff peaks form.
- Gently fold the whipped cream into the cream cheese mixture until fully combined.
- In serving cups, layer graham cracker crumbs at the bottom, then spoon the cheesecake mixture on top.
- Chill in the refrigerator for at least 2 hours.
- Before serving, top with your choice of fruit or chocolate.
Notes
4. Bunny Oreo Balls: Irresistibly Cute No-Bake Treats for Easter
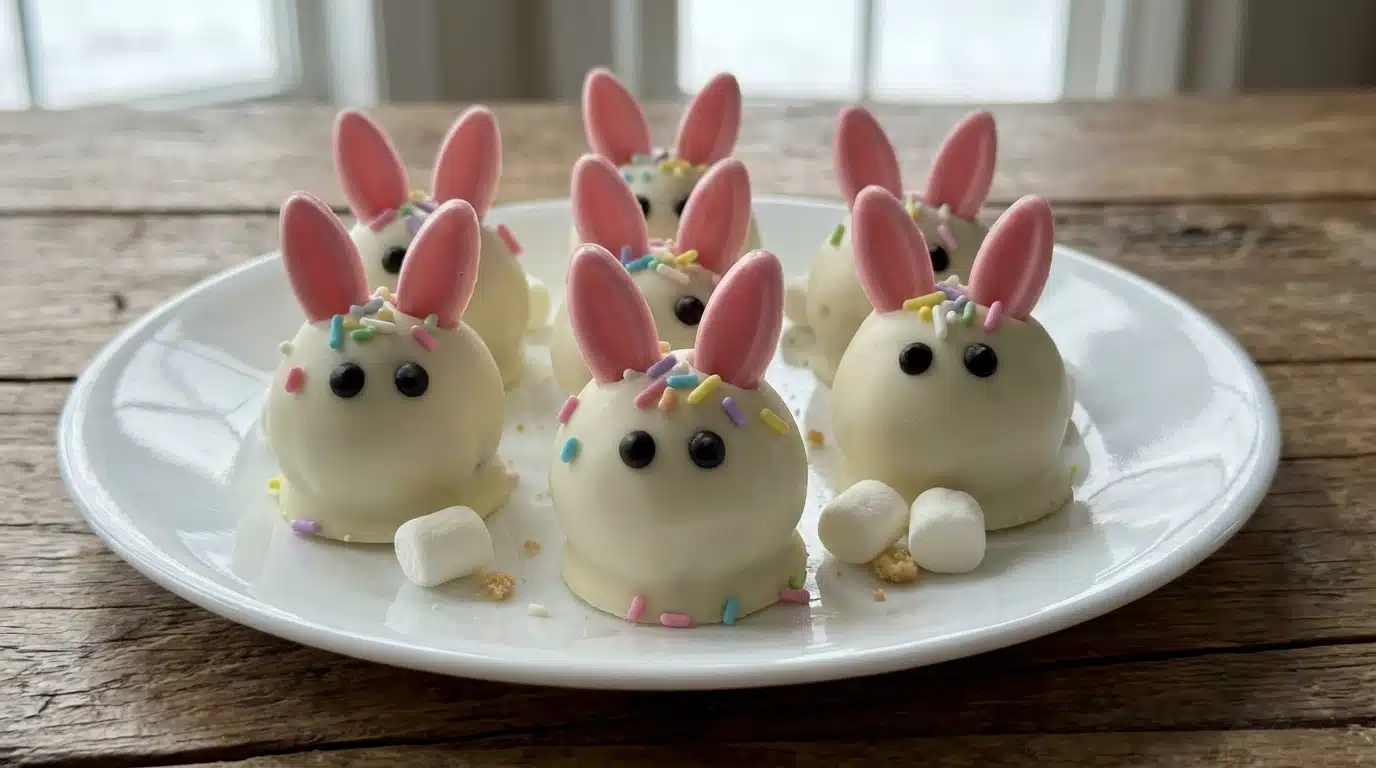
why make this recipe
Bunny Oreo Balls are quick, cute, and need no oven. They are perfect for Easter, kids’ parties, or easy gifts. For a simple side idea that pairs well with cozy treats, try this best sandwich for potato soup for a different snack idea.
introduction
These little bunnies are made from crushed Oreo cookies and cream cheese, then dipped in white chocolate. They look fun and taste rich. Even beginners can make them fast. If you like learning new simple food ideas, you might enjoy reading about black spaghetti recipes for another easy twist on party food.
how to make Bunny Oreo Balls
Follow the steps below to make the bunnies. Keep your tools ready: bowl, spoon, baking sheet, parchment paper, and a microwave-safe bowl for melting.
For a shine or small detail trick while decorating, you can check the Canaan honey trick for eyes for an idea you might adapt to small candy work.
Ingredients :
- 25 cookies Oreo Cookies (Gluten-free Oreos can be used as a substitute)
- 8 oz Cream Cheese (Use at room temperature for easy mixing)
- 12 oz White Chocolate/Candy Melts (Can substitute with dark chocolate)
- 12 pieces Mini Marshmallows (Used for bunny ears)
- 2 tbsp Pink Sugar Sprinkles (For decorating bunny ears)
- 2 oz Pink and Black Candy Melts (For bunny features like noses and whiskers)
Directions :
Step-by-Step Instructions
- Crush the Oreo cookies to fine crumbs. Use a food processor or place cookies in a bag and crush with a rolling pin.
- Mix the cookie crumbs with room-temperature cream cheese in a bowl until fully combined and smooth.
- Roll the mix into small balls (about 1 inch). Place them on a baking sheet lined with parchment paper. Chill in the fridge for 15–20 minutes to firm up.
- Melt the white chocolate or candy melts in a microwave-safe bowl in 20-second bursts, stirring between each, until smooth.
- Dip each chilled ball into the melted chocolate using a fork or dipping tool. Let excess drip off, then place back on parchment.
- Prepare the ears: cut 12 mini marshmallows in half vertically to make 24 ear halves. Dip the flat side lightly in melted chocolate and press two halves onto each ball to form ears. Add pink sugar sprinkles to the ear centers while chocolate is wet.
- Melt small amounts of pink and black candy melts in separate bowls for features. Use a toothpick or piping bag to add a small pink nose and black whiskers and eyes.
- Let all the bunnies set at room temperature or chill briefly in the fridge until the chocolate hardens.
how to serve Bunny Oreo Balls
Serve them on a platter lined with pastel paper or in a small basket with shredded paper grass for an Easter look. They pair well with warm, savory dishes if you want a full meal; for example, a bowl of cheeseburger macaroni soup makes a fun comfort-food combo at a family gathering.
how to store Bunny Oreo Balls
Store in an airtight container in the fridge for up to 7 days. Place parchment between layers to stop sticking. For longer storage, freeze them on a tray until firm, then transfer to a freezer-safe container for up to 1 month. Thaw in the fridge before serving.
tips to make Bunny Oreo Balls
- Use room-temperature cream cheese to mix easily and get smooth balls.
- Chill the balls before dipping to help the chocolate set neat.
- Work in small batches when melting candy so it stays smooth. For more general make-ahead meal ideas, see this cattle drive casserole for planning large family meals.
- Use a toothpick for fine details like eyes and whiskers to keep control.
variation (if any)
- Chocolate bunnies: use dark chocolate instead of white for a different look.
- Coconut ears: brush a little chocolate on marshmallow ears and dip in shredded coconut.
- Mini Oreo bites: make smaller balls for bite-size treats.
FAQs
Q: Can I use store-bought cream cheese frosting instead of cream cheese?
A: It may be sweeter and softer. Plain cream cheese gives the best texture and flavor.
Q: Can I make these without marshmallows?
A: Yes. You can use candy ears or shape ears from white chocolate instead.
Q: Do I need a food processor to crush Oreos?
A: No. Put cookies in a sealed bag and crush with a rolling pin until fine.
Q: Are these safe for kids to help with?
A: Yes. Kids can roll balls and stick on ears with supervision when using melted chocolate.
Q: Can I make them nut-free?
A: Yes. Check chocolate labels to be sure they are processed in a nut-free facility if needed.
Bunny Oreo Balls
Ingredients
Method
- Crush the Oreo cookies to fine crumbs either using a food processor or by placing cookies in a bag and crushing with a rolling pin.
- Mix the cookie crumbs with room-temperature cream cheese in a bowl until fully combined and smooth.
- Roll the mix into small balls (about 1 inch). Place them on a baking sheet lined with parchment paper. Chill in the fridge for 15–20 minutes to firm up.
- Melt the white chocolate or candy melts in a microwave-safe bowl in 20-second bursts, stirring between each until smooth.
- Dip each chilled ball into the melted chocolate using a fork or dipping tool. Let excess drip off, then place back on parchment.
- Prepare the ears: cut 12 mini marshmallows in half vertically to make 24 ear halves. Dip the flat side lightly in melted chocolate and press two halves onto each ball to form ears. Add pink sugar sprinkles to the ear centers while chocolate is wet.
- Melt small amounts of pink and black candy melts in separate bowls for features. Use a toothpick or piping bag to add a small pink nose and black whiskers and eyes.
- Let all the bunnies set at room temperature or chill briefly in the fridge until the chocolate hardens.
Notes
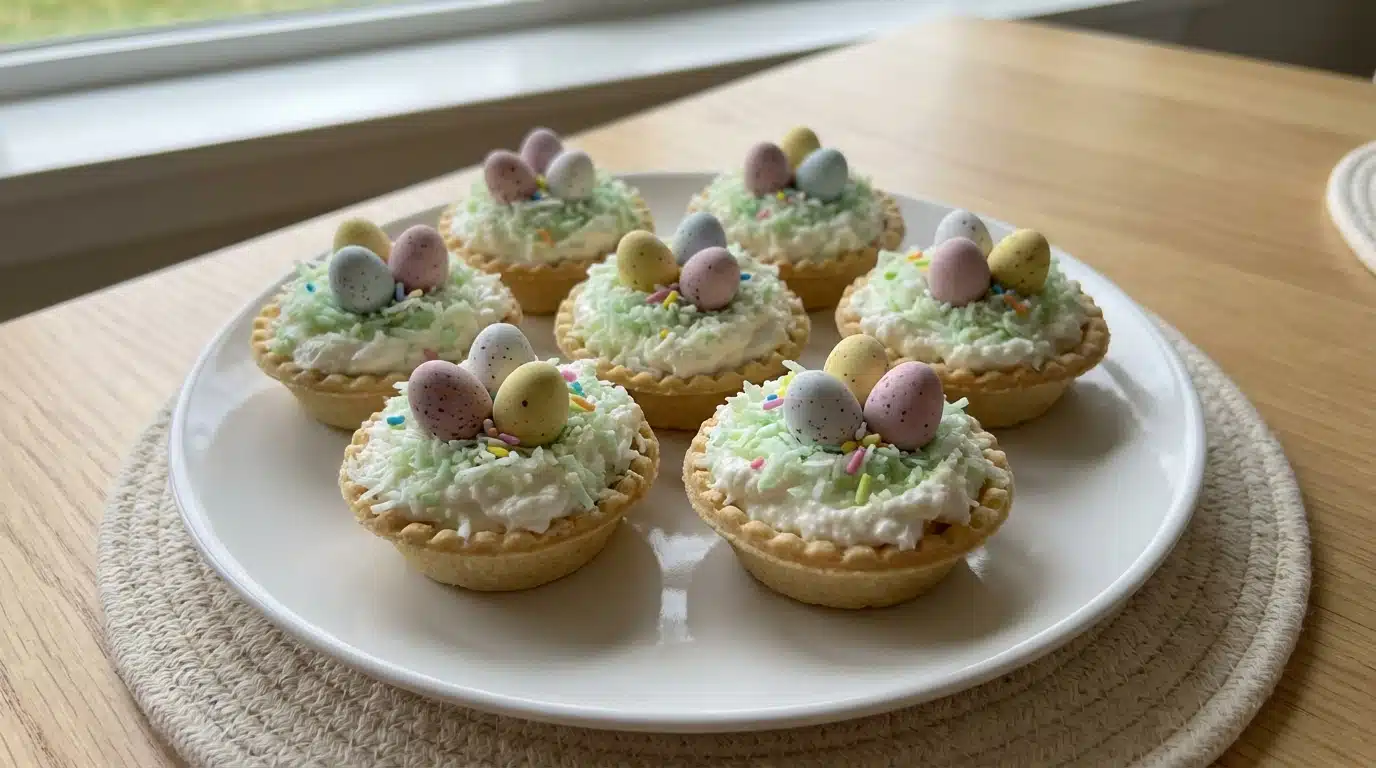
5. Easter Egg Nest Tarts
why make this recipe
This recipe makes small, pretty tarts that kids and adults will like. They use simple ingredients and need little baking time. It also pairs well with savory sides, so you can serve a mix of sweets and mains like Anjappar egg fried rice with tips and variations for a full table.
introduction
Easter Egg Nest Tarts are small chocolate tarts that look like nests with candy eggs on top. You can make them for spring parties, Easter brunch, or a fun snack. If you like egg recipes and want more ideas, check these 10 reasons to try a Persian egg breakfast for more egg inspiration.
how to make Easter Egg Nest Tarts
Make the crust, bake it briefly, and cool. Melt chocolate and mix with cream cheese, then fold in whipped cream. Spoon the chocolate filling into the cooled crusts and add candy eggs on top. For another easy egg-shaped dessert idea, see the cake mix fruit eggs guide.
Ingredients :
- 1 cup chocolate graham cracker crumbs
- 1/2 cup unsalted butter, melted
- 1 cup milk chocolate chips
- 1/2 cup cream cheese, softened
- 1 cup whipped cream
- Colorful Easter candy eggs (for topping)
Directions :
- Preheat the oven to 350°F (175°C).
- In a bowl, mix the graham cracker crumbs with the melted butter, then press the mixture into the bottom of a muffin tin to form crusts.
- Bake for 5-7 minutes until set. Let cool.
- In a large bowl, melt the milk chocolate chips and blend in the softened cream cheese until smooth.
- Fold in the whipped cream until everything is well combined.
- Spoon the chocolate mixture into the cooled crusts.
- Top each tart with colorful Easter candy eggs.
- Chill in the refrigerator before serving. Enjoy your festive treats!
how to serve Easter Egg Nest Tarts
Serve these tarts cold or slightly chilled. Place them on a small plate or a dessert tray. They go well with coffee or milk. You can also serve them with a simple savory dish like this baked egg casserole to balance the sweets and savories: baked egg casserole made with crackers.
how to store Easter Egg Nest Tarts
Store the tarts in the fridge in an airtight container. They keep well for 3–4 days. Freeze them for longer storage; thaw in the fridge before serving.
tips to make Easter Egg Nest Tarts
- Press the crust firmly into the muffin tin so it holds shape.
- Cool the crusts before adding the filling to prevent melting.
- Use good-quality chocolate for a richer taste.
- If you need an egg-free or vegan idea, review the vegan egg loaf for inspiration on plant-based swaps: egg loaf vegan recipe.
variation (if any)
- Use dark chocolate instead of milk chocolate for a less sweet tart.
- Add a bit of orange zest to the filling for a citrus note.
- Swap candy eggs for chocolate mini eggs or jelly beans for different looks.
FAQs
Q: Can I make the crust without a muffin tin?
A: Yes. Press the crust into a small tart pan or a mini tart mold and bake the same way.
Q: Can I use whipped topping instead of whipped cream?
A: Yes. Use stabilized whipped topping if you need more shelf life.
Q: How do I melt the chocolate without burning it?
A: Melt the chocolate in short bursts in the microwave, stirring between bursts, or use a double boiler and stir until smooth.
Q: Can I make these ahead of time?
A: Yes. Make them a day ahead and keep them chilled until serving.
Q: Are these safe for small children?
A: Yes, but check candy egg sizes to avoid choking hazards for very young children.
Easter Egg Nest Tarts
Ingredients
Method
- Preheat the oven to 350°F (175°C).
- In a bowl, mix the graham cracker crumbs with the melted butter, then press the mixture into the bottom of a muffin tin to form crusts.
- Bake for 5-7 minutes until set. Let cool.
- In a large bowl, melt the milk chocolate chips and blend in the softened cream cheese until smooth.
- Fold in the whipped cream until everything is well combined.
- Spoon the chocolate mixture into the cooled crusts.
- Top each tart with colorful Easter candy eggs.
- Chill in the refrigerator before serving. Enjoy your festive treats!
Notes
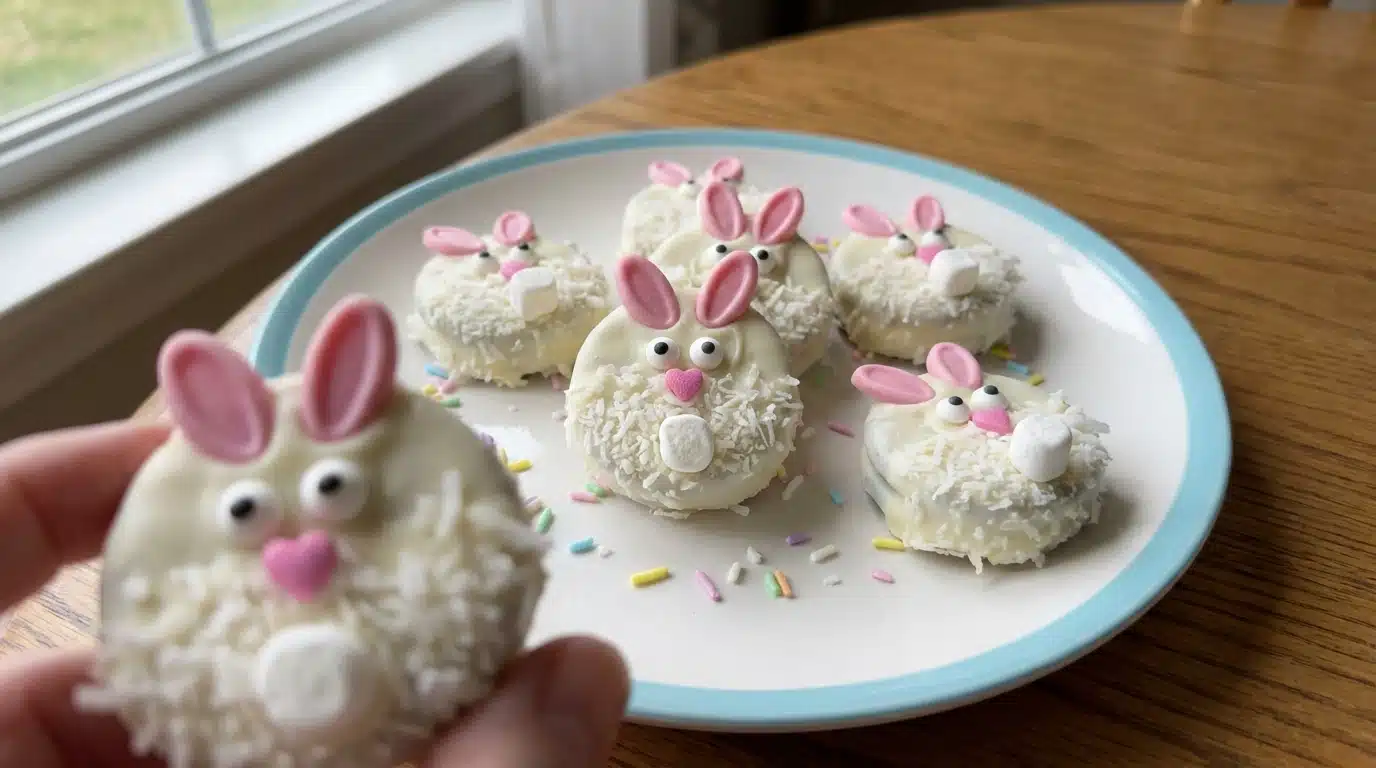
6. Easter Oreo Bunny Cookies
Make these fun little bunnies fast and with few tools.
introduction
These Easter Oreo Bunny Cookies are quick and fun to make. They use Oreos, white chocolate, candy melts, and a few small decorations. If you enjoy simple cookie treats, you may also like the easy texture of rose and pistachio shortbread cookies for another small-batch idea.
why make this recipe
This recipe is simple and fast. Kids can help dip and decorate. You need no oven and you use store-bought cookies. It makes a cute Easter snack that looks special but takes little time. For another sandwich-cookie idea, see the classic vanilla sandwich cookies.
how to make Easter Oreo Bunny Cookies
Work on a clean table and set out all your decorations. Melt chocolate in short bursts and stir. Dip each Oreo and add ears, eyes, and sprinkles while the chocolate is wet. For tips on melting and getting the right coating, you can read a short guide about the secret to chewy cookies that also helps with chocolate setting ideas.
Ingredients :
- Oreo cookies
- White chocolate
- Colored candy melts (for decorating)
- Candy eyes
- Mini marshmallows (for ears)
- Sprinkles (for decoration)
Directions :
- Melt white chocolate in a microwave-safe bowl.
- Dip half of each Oreo cookie into the melted white chocolate and place on parchment paper.
- Using colored candy melts, drizzle over the dipped Oreos to create bunny designs.
- Add candy eyes and mini marshmallows for the ears while the chocolate is still wet.
- Sprinkle with additional decorations if desired.
- Allow to set before serving.
how to serve Easter Oreo Bunny Cookies
Place cookies on a clean plate or a small tray. Serve at room temperature. You can put a few on a paper doily for a simple Easter display. For serving ideas with other soft cookies, check a fun example like Vermont chewy molasses cookies.
how to store Easter Oreo Bunny Cookies
Keep the cookies in an airtight container. Store at room temperature for up to 3 days. If your home is warm, put them in the fridge for up to one week. Let chilled cookies come to room temperature before serving so the chocolate is not too hard.
tips to make Easter Oreo Bunny Cookies
- Use good quality white chocolate for smooth coating.
- Melt chocolate in 15–20 second bursts and stir between bursts. For more melting tips, review this guide on the best chocolate handling.
- Work in small batches so the chocolate stays smooth.
- Press the mini marshmallow ears lightly so they stick but do not fall off.
- Place cookies on parchment so they do not stick.
variation (if any)
- Use filled sandwich cookies in different flavors for color.
- Swap white chocolate for milk chocolate to make dark bunnies.
- Use colored sugar or edible markers to add more face details.
- Use small jelly beans as noses instead of sprinkles.
FAQs
Q: How long does it take to make these?
A: About 20–30 minutes, including setting time.
Q: Can I make these ahead?
A: Yes. Make them a day ahead and store in an airtight container at room temperature.
Q: What if my chocolate seizes?
A: If the chocolate gets grainy, add a little melted vegetable oil or shortening and stir slowly until smooth.
Q: Can I use store-bought candy eyes?
A: Yes. Candy eyes are easy to stick on while the chocolate is wet.
Q: Can I freeze these cookies?
A: You can freeze them, but decorations may shift. Wrap them gently and thaw in the fridge before serving.
Easter Oreo Bunny Cookies
Ingredients
Method
- Work on a clean table and set out all your decorations.
- Melt white chocolate in a microwave-safe bowl, in 15-20 second bursts, stirring between each.
- Dip half of each Oreo cookie into the melted white chocolate and place on parchment paper.
- Using colored candy melts, drizzle over the dipped Oreos to create bunny designs.
- Add candy eyes and mini marshmallows for the ears while the chocolate is still wet.
- Sprinkle with additional decorations if desired.
- Allow to set before serving.
Notes
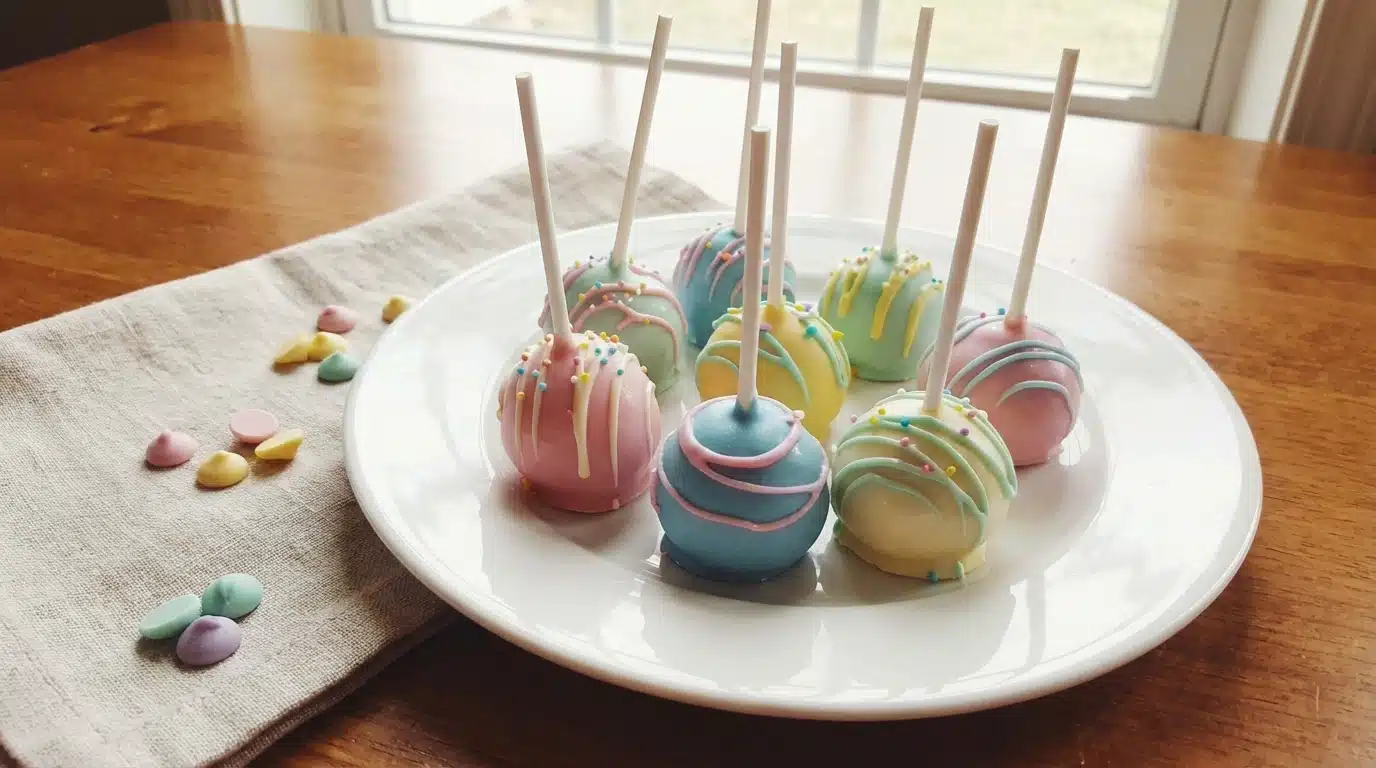
7. Pastel Easter Egg Cake Pops
Make these pastel Easter egg cake pops for a simple and fun treat at home.
introduction
These Pastel Easter Egg Cake Pops are small, sweet, and bright. They use a boxed cake mix and simple chocolate coating. For ideas on working with cake mix for egg-shaped treats, see delicious and easy cake mix fruit eggs guide.
why make this recipe
Make these cake pops because they look like little Easter eggs and they taste great. They cook fast and kids enjoy helping. If you like egg-themed recipes, you may also enjoy reading about Persian egg breakfast benefits for more egg ideas.
how to make Pastel Easter Egg Cake Pops
Mix, bake, crumble, form, dip, and decorate. You can follow the full steps below, and keep the cake texture soft so the balls hold their shape. For general tips on handling eggs and mix-ins in small treats, a short guide like anjappar egg fried rice tips can give good ideas about working with eggs and heat.
Ingredients :
- 1 box cake mix (any flavor)
- 3 large eggs
- 1/2 cup vegetable oil
- 1 cup water
- 1 cup chocolate chips or melting chocolate
- Pastel colored sprinkles
- Lollipop sticks
Directions :
- Prepare the cake mix according to package instructions using eggs, vegetable oil, and water. Bake in a 9×13 inch pan as directed. Allow the cake to cool completely.
- Crumble the cooled cake into a large bowl until it is fine crumbs.
- Form small balls of the cake mixture and insert a lollipop stick into each ball.
- Dip each cake pop into melted chocolate and allow excess chocolate to drip off.
- Before the chocolate sets, sprinkle with pastel colored sprinkles.
- Let the cake pops cool upright in a styrofoam block or a cup until the chocolate is hardened.
- Serve and enjoy your festive Easter treats!
how to serve Pastel Easter Egg Cake Pops
Serve them on a tray or in a small cup filled with shredded paper or grass for a basket look. You can pair them with other simple baked treats for a party. For more ideas on mixing quick bakes for a table of snacks, see banana bread with pancake mix for a simple bake idea to serve together.
how to store Pastel Easter Egg Cake Pops
Keep cake pops in an airtight container at room temperature for up to 2 days. For longer storage, place them in the fridge for up to 1 week. Let them come to room temperature before serving if chilled.
tips to make Pastel Easter Egg Cake Pops
Use a firm but soft cake mix texture so balls hold on the sticks. Melt chocolate slowly and use a tall glass to dip easily. Stick cake pops upright while chocolate sets. For more tips on coating and decorating cakes, you can read this cherry chip cake guide for decoration ideas that also apply to small treats.
variation (if any)
- Use different cake mix flavors like chocolate, vanilla, or lemon.
- Add a small spoon of frosting to the crumbs if the mixture is too dry.
- Use white chocolate and food color to tint the coating instead of sprinkles.
- Roll in crushed candy or coconut instead of sprinkles for texture.
FAQs
Q: Can I make the cake pops ahead?
A: Yes. Make them and keep in the fridge for up to a week or freeze for up to a month.
Q: What if the cake is too dry to form balls?
A: Add a little frosting or a teaspoon of milk until the crumbs hold together.
Q: Can I use candy melts instead of chocolate chips?
A: Yes. Candy melts work well and come in many colors for pastel looks.
Q: Do I need a styrofoam block?
A: No. You can use a cup with rice or a clean potato to hold the sticks upright while they set.
Q: Can kids help?
A: Yes. Kids can roll balls and add sprinkles with supervision.
Pastel Easter Egg Cake Pops
Ingredients
Method
- Prepare the cake mix according to package instructions using eggs, vegetable oil, and water.
- Bake in a 9×13 inch pan as directed.
- Allow the cake to cool completely.
- Crumble the cooled cake into a large bowl until it is fine crumbs.
- Form small balls of the cake mixture and insert a lollipop stick into each ball.
- Dip each cake pop into melted chocolate and allow excess chocolate to drip off.
- Before the chocolate sets, sprinkle with pastel colored sprinkles.
- Let the cake pops cool upright in a styrofoam block or a cup until the chocolate is hardened.
- Serve them on a tray or in a small cup filled with shredded paper or grass for a basket look.
Notes
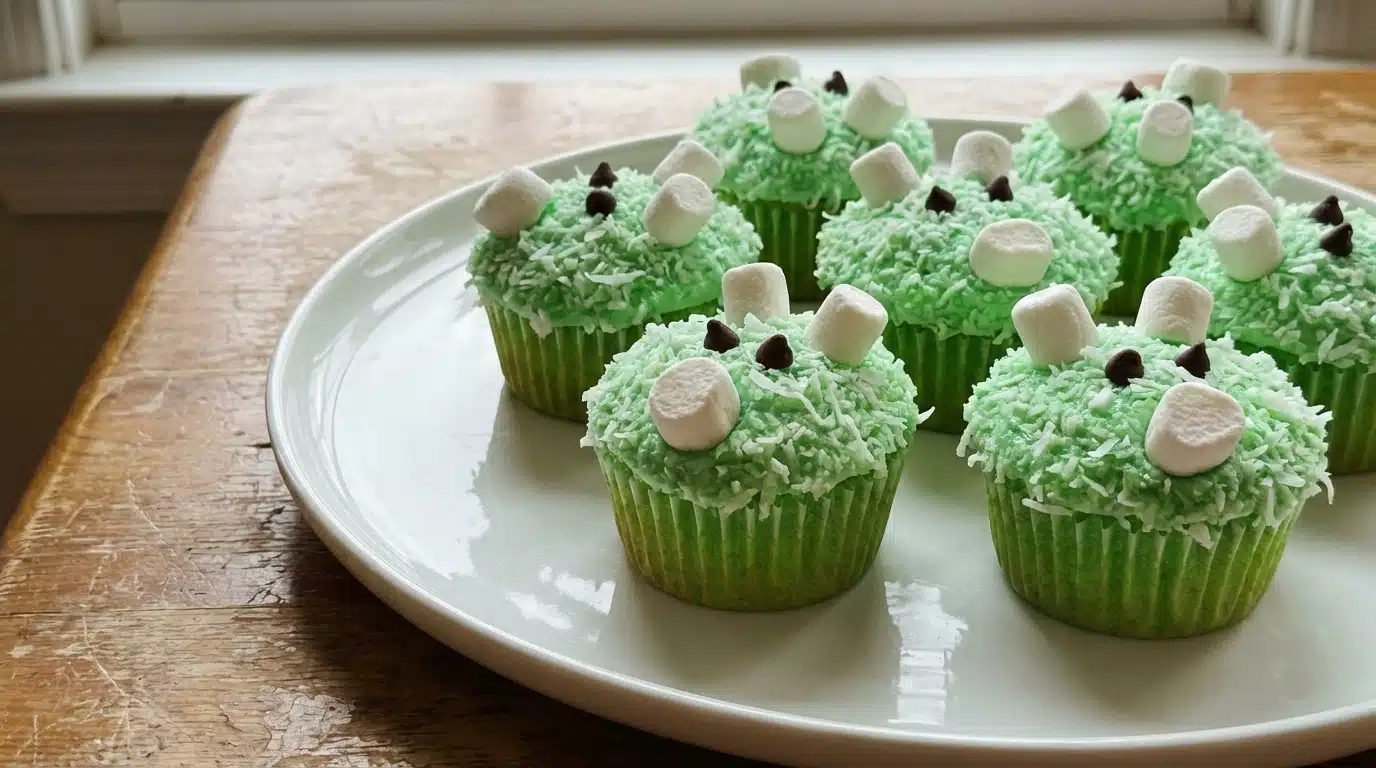
8. Green Easter Bunny Cupcakes
why make this recipe
Make these Green Easter Bunny Cupcakes to add fun to your holiday table. They bring bright color and a soft cake that kids and adults like. If you enjoy green holiday dishes, this green bean casserole twist shows another easy festive idea to try.
how to make Green Easter Bunny Cupcakes
Follow the Directions section below step by step. Mix the batter, tint it green, bake, cool, then frost. Add candy or fondant ears to make each cupcake look like a little green bunny. The steps are simple and clear.
Ingredients :
1 1/2 cups all-purpose flour, 1 cup granulated sugar, 1/2 cup unsalted butter, softened, 2 large eggs, 1/2 cup milk, 1 teaspoon vanilla extract, 2 teaspoons baking powder, 1/4 teaspoon salt, Green food coloring, Fluffy frosting (store-bought or homemade), Candy or fondant for bunny ears. You can read a tip about keeping green dishes bright at how to keep green beans from being runny for ideas on texture and color.
Directions :
- Preheat your oven to 350°F (175°C) and line a cupcake pan with cupcake liners.
- In a large bowl, cream together the softened butter and sugar until fluffy.
- Beat in the eggs one at a time, then stir in the milk and vanilla extract.
- In another bowl, whisk together the flour, baking powder, and salt. Gradually add the dry ingredients to the wet mixture and mix until just combined.
- Add green food coloring until you reach the desired shade.
- Fill each cupcake liner about 2/3 full with batter.
- Bake for 18-20 minutes, or until a toothpick inserted into the center comes out clean.
- Allow cupcakes to cool completely.
- Frost with fluffy green frosting, and craft bunny ears using candy or fondant.
- Arrange on a platter and serve during your Easter celebrations!
introduction
These cupcakes are soft, lightly sweet, and bright green. They make a clear holiday theme with small bunny ears on top. For a green drink to serve with them, try a simple green smoothie for weight loss as a light pairing.
how to serve Green Easter Bunny Cupcakes
Place the cupcakes on a clean platter. Serve at room temperature. Put some napkins nearby for kids. They pair well with simple drinks or a mild coffee.
how to store Green Easter Bunny Cupcakes
Keep cupcakes in an airtight container. Store at room temperature for up to 2 days. For longer storage, chill them for up to 5 days. Bring chilled cupcakes to room temperature before serving for best texture.
tips to make Green Easter Bunny Cupcakes
Use room temperature eggs and butter for a smooth batter. Do not overmix after adding flour. Add food coloring a little at a time to control color. For fluffier frosting, beat it until light and smooth. You can learn more ideas for dressing green dishes in this guide on ways to fancy up green beans that give simple presentation tips you can reuse.
variation (if any)
Make these cupcakes into mini cakes by baking in a small round pan. Try coconut frosting or lemon frosting for a fresh twist. For a savory-sweet table, pair with a side dish like the sweet and savory green beans that mix sweet flavors with a bit of crunch.
FAQs
Q: Can I use oil instead of butter?
A: Yes. Use 1/2 cup vegetable oil instead of butter for a moist cake.
Q: How do I make the frosting green?
A: Add a few drops of green food coloring to white frosting and mix until even.
Q: Can I make the bunny ears ahead of time?
A: Yes. Make candy or fondant ears a day ahead and store them in a cool, dry place.
Q: Can I freeze these cupcakes?
A: Yes. Freeze unfrosted cupcakes in a sealed bag for up to 2 months and thaw before frosting.
Q: How do I prevent the color from fading?
A: Use gel food coloring for stronger color and avoid overbaking the cupcakes.
Green Easter Bunny Cupcakes
Ingredients
Method
- Preheat your oven to 350°F (175°C) and line a cupcake pan with cupcake liners.
- In a large bowl, cream together the softened butter and sugar until fluffy.
- Beat in the eggs one at a time, then stir in the milk and vanilla extract.
- In another bowl, whisk together the flour, baking powder, and salt.
- Gradually add the dry ingredients to the wet mixture and mix until just combined.
- Add green food coloring until you reach the desired shade.
- Fill each cupcake liner about 2/3 full with batter.
- Bake for 18-20 minutes, or until a toothpick inserted into the center comes out clean.
- Allow cupcakes to cool completely.
- Frost with fluffy green frosting and craft bunny ears using candy or fondant.
- Arrange on a platter and serve during your Easter celebrations.